Showing posts with label Guest Designer. Show all posts

Sunday, 8 April 2018

Kraftsupplies4U is having a DT Call!!!!!!


Kraft Supplies 4 U is having a Guest Design Team Call
Open to International!!
Requirements:
Four YouTube videos a month: one on your box of items and three projects. One video a week. I am a drama free team.
Also you will have to post a link to your video on Kraftsupplies4u Facebook page..
You can create what your heart desires as long as it is in good taste.
I have two positions available. The positions last for three months.
If You are interested please private message Julie McDonald on Facebook  with your Youtube name and any other social media you wish us to see. Please have some projects that you have done so I can see your work. You don't have to make anything for the DT call. If you have applied before and would like to apply again that will be fine.
Guest DT Call will end in 2 weeks time April 26 2018
Thank you for your interest.

Tuesday, 11 April 2017

Shabby Chic Altered Box by GDT Sandi Nagel

 
Good Morning everyone! Today we have talented Guest Designer Sandi Nagel up with her take on an altered box, shabby chic style.
 
 
Sandi has used lots of gorgeous laces, trims and flowers from the KS4U store. She also has used the metal embellishment in the center and topped it off with some bling from KS4U.


This is a gorgeous box, filled with so much beautiful goodies!
Sandi as listed the items she used below, and you can find them all at Kraftsupplies4U.


Pearl Trim - b412
Pink Roses - a953
Pink Fabric Roses - a987
Bronze Emblem Filigrees - a194
Embroidered Lace - a44
 
 
Thanks for stopping by today, please check out the Kraftsupplies4U store.


Tuesday, 7 March 2017

Shabby Elegant Angel Wall Hanging by GDT Dawn

Hi everyone, it's Dawn here with my first guest design team project for Shabby is Chic Boutique on Zibbet.


 I was inspired by this angel image to create a tattered wall hanging. I used the beautiful butterfly lace,trim and bling from Shabby is Chic Boutique to give this piece a beautiful elegance amidst the tattered remnant pieces from my stash.


 Please check out Shabby is Chic Boutique on Zibbet for beautiful products for your next project!
Thank you so much for having a look!!


Thursday, 10 November 2016

Shabby Box & Bag by GDT Sue Ann


Hello everyone, Sue Ann here today to share my first projects as Guest Designer for Shabby is Chic Boutique.


First up is this shabby little wooden box was created to demonstrate to you how we can alter laces to fit our needs. Using SCB's Heart Daisy Dangle Lace, I was able to create three different laces using just one of Amy's.
 
Our money will go further and also we can create something no one else has. This is not my idea and I learned this little trick from the very talented Maggie White and I must give her credit for this Fabulous trick.
 
 Now onto the how to...
First, give a base coat to the wooden box in your color of choice. Glue pretty paper to every area. Cut the bottom section of the lace off. I cut from the bottom of the daisies and go across my length of lace I need for my project. Glue the bottom section of lace to the bottom top edge of the box. Be sure not to glue the lid to the bottom or you won't be able to open your box. Yes I did that, lol... Now to separate the next section of the lace cut the daisy strip from the rest of your length of lace.   Put the daisy section away as we won't be using it for this project. Now glue the very top section of your lace to the very top edge of your box.
 
 
Next using SBC's 4mm white flat back pearl trim glue a length around the bottom top edge of the lid, just below the top section of the lace you previously applied to your box. Optional: you can add miscellaneous pearl pieces to each corner, and a handmade flower with bling to the center of the lid. Also add large pearls to the bottom for feet.
 
 
  Inside the box glue a piece of pretty paper to the insides as well. Please watch my video at the end of this post for more detailed instructions
 
My second project for this week is a Shabby/Vintage Gift Bag
 
 
First, remove the drawstring from the pouch. Paint the front and back of pouch with color of choice. Be sure to put a piece of acetate or cardboard inside your pouch to prevent it drying closed, then it will no longer be a pouch or gift bag.
 
Here is how I made the bag.
First, glue the scrap of lace panel completely around the pouch. Glue appliqués to front and back. Glue Heart Daisy Dangle Lace to the front and back bottom edge. Glue Pink She'll Scalloped Lace along top edge of the Heart Dangle Lace along the edge as well. Glue small flat narrow pink lace to top edge of the pouch.
 
 
Glue 4mm white pearl trim to the top edge of pouch. Also along the top edge of the pink shell scalloped lace edge. And glue pearl trim around the vintage photo. Glue the vintage photo to the front center of the pouch. Glue a white bow to each side of the pouch. Cut a length of the 6mm White Braid Trim for the strap and then glue a length of the pearl strand on top of the braid trim. Next, glue an end to each side of the pouch and add a large pearl bling to the center bottom of the pouch on top of the pink shell scalloped lace. Add a handmade stickpin to the side of the vintage photo for a final touch.
  Please see my video for more information on how I made both projects.
 
 
Thanks so much for stopping by today, please check out Shabby is Chic Boutique on Zibbet.
 
Big Hugs, Sue Ann


Tuesday, 8 November 2016

Shabby Box and Bag by GDT Donna

Hi there my name is Donna, and this is my first Design Team project for the Shabby is Chic Boutique. I’m so excited to show you what I have created. I created an altered cross paper box and an altered draw string canvas bag (which can be found in the shop).


In this picture you will see the cross box that I altered. I painted the box pink and then I used the white ruffled trim minus the lace. I cut the lace from the trim to shorten it. I used pink flat back pearls to trim the top of the lace. Then I cut the middle section of the floral lace and used it on top as well as the rose trim. On the bottom I used the multi strand pearls. I was really pleased how it turned out.


To make the altered bag, I used the soft pink stretchy lace to first cover the canvas bag. Then I used the white fabric lace on top of that. I cut and manipulated the pieces on the lace that I wanted to cover the bag. I tucked pieces of the white lace throughout the bag. I then used the pink scalloped lace on the top of the bag with two overlapping rows. I then used a section of the pale pink floral to line the sides.


To create the flower cluster, I used pink rolled roses, and ribbon to create a flower. I also used the lovely foam flowers. I snipped little pieces from the scallop lace to tuck in beneath the flower cluster as well as some of the rose trim.


The back was made much like the front with the exception of the flower. I used scrap lace from the ruffle trim and some of the pink trim to create a flower. I used the light pink daisy trim on the sides.
 
 
Here is a picture of both projects together. As mentioned all items used except the cross box were from the Shabby is Chic Boutique. I also made earrings, necklace, and a charm to put in the box and bag. The cross charms were from the shop as well.
 
 
Thanks so much for stopping by today, please check out all these items in the Shabby is Chic Boutique Store on Zibbet.


Tuesday, 18 October 2016

Shabby Cuff and Bag by GDT Elizabeth

Hello friends, Elizabeth here today, I am one of the Guest Designers for Shabby is Chic Boutique for the month of October 2016.
 I was inspired by SCB laces and designed this Handbag and cuff set using SCB laces and a few embellishments from my stash.
 
 
I began this project with SCB Canvas drawstring bag. I really wanted to use the wide pink lace in a project and soon realized that it wrapped perfectly around the pouch. I attached it to the bag and my inspiration was on a roll. I decided to add the dangle laces to the bottom to display the beauty of the lace and it gave the project beautiful movement.


Later, I decided to place another delicate lace with some ribbon at the top. I was a bit concerned about the drawstring I still wanted it to draw so I carefully attached the lace around it. Then I realized that the string was too thick and I replaced it with a thin pink cord that I found in my stash.
 
 
I decided that I wanted my elegant bag to have a handle. As I tossed around ideas I realized that I just might be able to make my own handle. I twisted some bead trim together to form an elegant handle. I finished it off with one of SCB stunning pearl embellishments. I wanted the beauty of the lace to be visible so I decided to use a flower from SCB collar lace. It was perfect just enough and not too much. I finished off the project by embellishing it with a few flatback pearls from my stash. SCB awesome heart embellishment added just a bit more elegance to the bottom of the bag.
 
 
Now for the elegant wrist cuff. I began this project with the idea that I wanted to bring many of the same elements of the handbag into the cuff. I had just enough of SCB stretchy lace to wrap around my wrist. I began layering similar laces as I did for the handbag.


  I ended by placing a combination of SCB bling, and some from my own stash in the mix. I hope you like my designs and are inspired to head on over to Shabby Chic Boutique Zibbet store, where you will find all the lovely laces I used.
 

Tuesday, 4 October 2016

Shabby Velvet Pumpkin by GDT Elizabeth B.

Good morning Elizabeth here with my first GDT project for Shabby is Chic Boutique on Zibbet.  I have created this seasonal shabby pumpkin out of velvet material and lots of wonderful items from the SCB store.
 
 
With velvet brown fabric and velvet pink ribbons from my stash I was ready to design with Shabby is Chic Boutique Delicate laces. Included are handmade flowers and other embellishments from my own stash.
 
 
I began embellishment of this project by surrounding the top of my handmade pumpkin with SCB Dangle laces. My goal was to have the laces stream down the sides as the main overall effect. I later attached another delicate trim to the dangle laces to give the impression of longer delicate creeping vines. Surrounding the top cluster of handmade flowers, you will find bits and pieces of SCB laces as well as flowers from SCB Lace flower collar. SCB delicate pink and white lace droops down around the entire pumpkin and is the star lace of this project. This delicate pink lace gives the impression of a flowery vine streaming downward. SCB laces were embellished with pink flat back pearls to enhance the color and beauty of the lace.
 
 
 At the center is a removable skeleton cameo which enhances and brings the soft pink delicate SCB lace to life. SCB has a beautiful butterfly like trim. I cut out the butterflies and formed them as though they were ready for flight to experience a taste of a bit of nectar from another flower. In the center of each butterfly I added a pearl trim as the body. Along the edges where I wrapped the pumpkin with velvet ribbon you will find more SCB butterflies that I used to embellish as the star of that portion of this Velvet Lace Pumpkin.


Peeking through the top embellishments you will see how I utilized the soft creamy delicate SCB flowered neck applique flowers. I removed the flowers and added them throughout my project.
 
 
 I still have some of this left for my next project. Amongst the flowers peeking beneath the flower embellishments you will find more SCB dangle laces giving the edges of my design a soft blended outcome.
Please check out my social media links for more info on this project and other items I have created.
Thanks for stopping by today!


Crafty DevotionLiz Benavides - Designer
Yt: https://www.youtube.com/channel/UCQ...
Facebook: https://www.facebook.com/CraftyDevo...
Email: CraftyDevotions@gmail.com


Thursday, 22 September 2016

Shabby Altered Cigar Box by GDT Mimi C.

Happy Thursday Everyone!  Mimi here and  I am back to share with you all my 2nd and last GDT project for Shabby is Chic Boutique.
 
 
For this project, I decided to alter a cigar box that I've had in my stash for quite some time.  And what a transformation it has taken!  I finally was able to use Prima's "Tales of You and Me" collection to cover my entire box after sanding, painting, & inking all the edges.  Then came the fun part...using all the beautiful trims, laces, and embellishments from SCB!  On the top of the cigar box, I first laid down some of the clustered rose embroidered trim on the top and bottom to give the box somewhat of a frame and a base to layer my 2 flower clusters in the top left corner and bottom right corner of the lid. 
 
 
 The main focal piece in the top left corner flower cluster is one of the beautiful foam roses in ivory.  I also incorporated a piece of the butterfly dangle lace in the other cluster to give it a bit more interest.  As you can see, there is a abundance of flowers on this project which went perfectly with the clustered rose embroidered lace from SCB.  I did add stickles to all the flowers to give it more sparkle as well as add an ornate frame toward the upper portion of the lid that has been spray painted in gold to match the gold in all the hardware. 


Right below the edge of the lid, there is almost a perfect 4mm slant (about a 45 degree angle) that I added the 4mm pink flatback pearl trim to and goes around the entire top of the box.  I then adhered the folded tulle trim in white along the lid on 3 sides, excluding the back, with the white flatback 5-row strand acrylic trim on top. 


The 5-row flatback acrylic trim is only adhered to the 2 sides of the lid so that the lace would lay flatter on top of the latch hardware on the front side of the box.  I love how the folded tulle trim makes the altered box look so soft and feminine.


 I hope you all enjoy what I have created and don't forget to head over to Shabby is Chic Boutique on Zibbet to grab some of these beautiful trims, laces, & embellishments for your next crafty project!
 
Products Used From SCB:
  • Foam Roses in Ivory
  • 4mm Flatback Pearl Trim - Pink
  • Folded Tulle Trim in White
  • Butterfly Dangle Lace
  • Clustered Rose Embroidered Lace
  • White Flatback 5-Row Strand Acrylic Trim


Tuesday, 20 September 2016

Shabby Cards by GDT Jen E.


Hey crafters! It's me Jen Evers with another Shabby is Chic Boutique blog post! Only this time, I decided to do my style of shabby on 3 cards!
 

On this stunning card I included laces, trims and some flat back pearls. The pearls are purple and match the card because I colored them with my spectrum noir markers! Isn't it COOL that you can buy from the boutique in white and change it to any color you want to match your design?!!! I love the Shabby Chic's selection!!


 My second card even includes some metal pieces, trims and some embossing to seal the deal. I just adore the white on white look of the paper and the laces! (I took this one to work and someone bought it on the spot!) You can jazz up your custom creations with style from the Boutique. Go check it out!!


My 3rd and final card is actually made with the baggie my goodies from Shabby is Chic Design team goodies came in. I know!! Creative and practical huh?!


This is my farewell as it's my last post as a guest designer for September. Keep crafting on, and don't forget to shop at the Shabby is Chic Boutique!!

Please check out my YouTube video for more on my cards I have created!

 
xoxo
JEN


Thursday, 8 September 2016

Shabby Altered Cuff by GDT Mimi C.

Here is a lace cuff that I created as my very 1st guest design team project for Shabby is Chic Boutique!
 
 
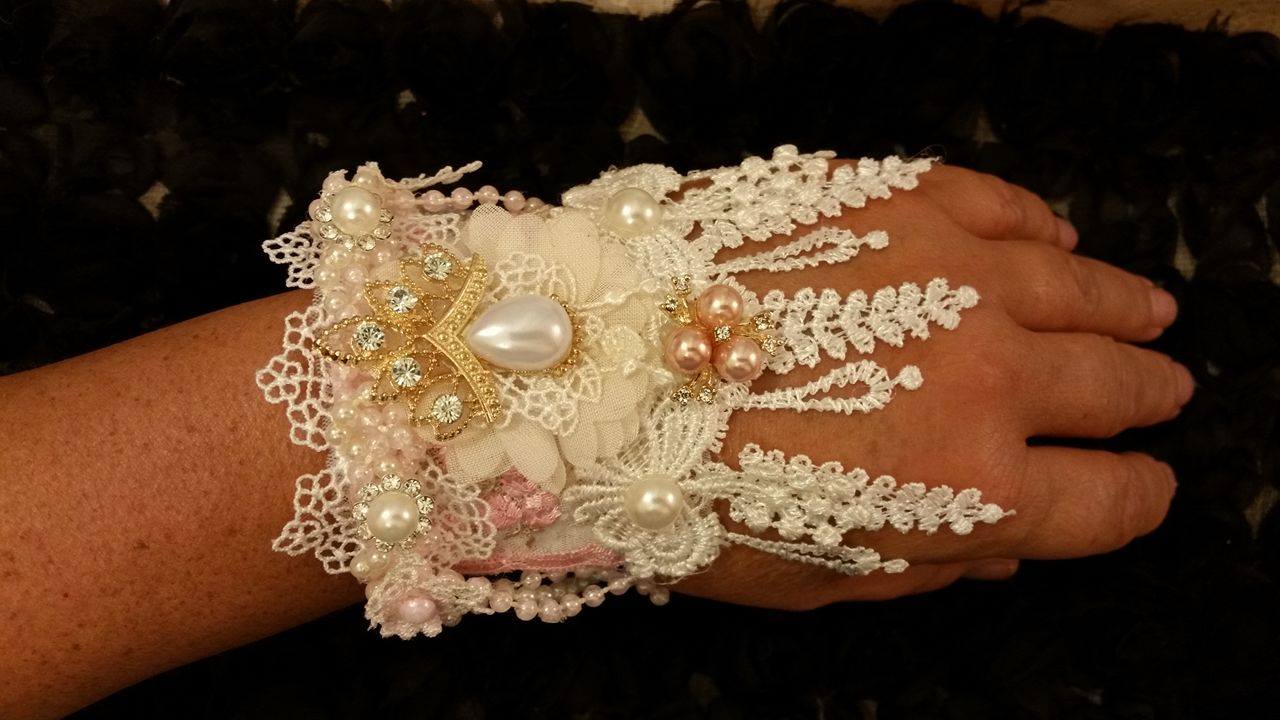
  I have never made a lace cuff before, so I had a great time creating this shabby lace cuff using all the beautiful trims, laces, and embellishments from SCB on Zibbet. The base of my cuff is made using the beautiful clustered rose venice lace.
 
 
  Layered on top of that is the super dainty pale pink flower trim. I then layered one of the beautiful butterfly appliqués from SCB and cut apart the butterfly dangle lace to get 2 smaller butterflies to layer on either side of the bigger butterfly appliqué. The main centerpiece is made from the folded tulle trim in blush. I actually cut the trim apart to make the luscious shabby flower topped with a crochet doily and a beautiful pearl and rhinestone bling piece from SCB.
 
 
  I cut apart the flower dangle trim and layered 3 of the flowers together and placed them underneath the shabby tulle flower I created. With the left over dangle pieces from the flower dangle trim I had left over, I tucked them under either side of the shabby tulle flower.
 
 
  I also added some of the 4mm flatback pearl trim in pink to give the cuff a little more dimension and color. Lastly, I sewed on some snaps to be able to wear this beauty on my wrist.
 
• 4mm Flat Back Pearl Trim – pink
• Flower Dangle Trim
• Folded Tulle Trim in Blush
• Pink Pearl and Rhinestone Bling
• Clustered Rose Venice Lace
• Butterfly Appliqué
• Butterfly Dangle Lace
 
• Dainty Pale Pink Flower Trim
 
Thanks for stopping by today. Please check out all the great items from Shabby is Chic Boutique on Zibbet.


Tuesday, 6 September 2016

Altered Gift Box by GDT Jen E.


Good morning friends, Jen here today with my first Guest Design post for Shabby is Chic Boutique on Zibbet.
Today I have made a gift box.


Before assembling the box I added some light weight tissue type fabric to the side panels
 
Then I assembled the box...
 
 
Next, I added trims and some gorgeous lace from Shabby is Chic Boutique on Zibbet.


Lastly, the finishing and most exciting touches... the BOW and TASSLE!!
 

WHAT A STUNNING ACCENT! 
 

The products from Shabby is Chic Boutique were SO much fun to play with! Why don't you go over and check them out for yourself? You just might find the piece you've been looking for to finish off your masterpiece!

Here is  my video showing how I made this gift box.

Thanks for stopping by! 

Encourage each other always! 

xoxo JEN