Showing posts with label pearl trim. Show all posts

Monday, 8 May 2017

Shabby Baskets by DT Member Sarah

Good morning friends, today we have Sarah up on the blog sharing her next project for Kraftsupplies4U.
 
Don't forget there is a SALE on right now for 25% off your order at the KS4U Stores
 
As you can see Sarah has created some beautiful baskets for a lovely accent to any wedding.
 
White basket has Pearl trim from shop. Pink basket has dangle lace and beaded trim which you can find in the Kraftsupplies4U Store.


Please visit Sarah's Video to hear more about how she created these baskets.
 
 
Thanks for stopping by today, and please check out the items we have in stock today at

Thursday, 13 April 2017

Victorian Inspired Fabric Brooch Holder by DT Member Maggie White

Good morning everyone, today we have the talented Maggie White up on the blog today.
 
Maggie has created this gorgeous Victorian inspired fabric brooch holder with lots of laces, trims and embellishments from Kraftsupplies4u.
 
Front of Book


Back of the book.

 
Maggie has created a separation in the center of the book with a vintage doily and some beautiful images.

 
Watch Maggie's full video below!
 
 
Thanks for stopping by today, please check out all the great items in the Kraftsupplies4U store!
 

Tuesday, 11 April 2017

Shabby Chic Altered Box by GDT Sandi Nagel

 
Good Morning everyone! Today we have talented Guest Designer Sandi Nagel up with her take on an altered box, shabby chic style.
 
 
Sandi has used lots of gorgeous laces, trims and flowers from the KS4U store. She also has used the metal embellishment in the center and topped it off with some bling from KS4U.


This is a gorgeous box, filled with so much beautiful goodies!
Sandi as listed the items she used below, and you can find them all at Kraftsupplies4U.


Pearl Trim - b412
Pink Roses - a953
Pink Fabric Roses - a987
Bronze Emblem Filigrees - a194
Embroidered Lace - a44
 
 
Thanks for stopping by today, please check out the Kraftsupplies4U store.


Sunday, 2 April 2017

Mary's April/May DT Package!

Hello everyone! I am so excited to be a member of Julie's Kraft Supplies 4 U blog team!! I have been a customer of Julie's for a few years and was thrilled when she asked me to be part of her team. Today I will be sharing my DT package for April and May. Julie has two amazing stores: KS4U.net and Krafts Supplies 4 u on Zibbet. The item codes I will be giving you are for the KS4U.net store.

First up is this amazing extra large white butterfly (b287). The butterfly is 6.5" wide by 4.5" long. You will see what I did with it in my first project coming up later this month. Make sure to check out the store for other colors and sizes.
This cream lace trim (b567), is 3.75" wide. What I love about this lace is that it will look great just as it is OR you can cut it apart into  five different laces! Talk about a bang for your buck!
Here is another fantastic trim that could be cut apart and you would have some nice mini doilies! This is the crochet trim (b569).
This white sheer lace (b679) with these amazing hearts is one of the trims the Julie received when she purchased Shabby is Chic Boutique. This lace is 4" wide.
I am in love with this dainty trim. This white flower trim (b588) is perfect for finishing off a project or for cards being the it is only .50" wide.
  Here is another great trim! This is a white lace (b600) and is 2" wide.
 Here is another great trim Julie got from Shabby is Chic Boutique! This white lace - b720 is 1" wide
I am in love with her mesh bling! You can keep it as is or cut it apart! From left to right we have:


  •  Pearl Mesh Trim Small (b428), 3.5mm pearls and 4.50" wide in mesh form
  •  Pearl Mesh Trim Medium (HERE), 5mm pearls and 4.5" wide in mesh form
  •  Pearl Trim (b412), 8mm pearls and 2" wide in mesh form

Make sure to check out the Kraft Supplies 4 U group on Facebook! Have a great week!

Monday, 30 January 2017

Shabby Love Banner by DT Member Goldie

Hi everyone Goldie here. It's my turn on the blog today. It's a happy and sad day for me because I'm happy to share my 2nd design team project for the month of January, but it's sad also because it has come to the end of my term for Shabby Is Chic Boutique. Before I share the details of my project I want to give a huge thank you to Amy for asking me to be one of her designers. It's been a wonderful time and I've learned to "let" myself craft outside my comfort zone. (Lol! Yes "let" myself.) Again, thank you Amy Love! Hugs to you always girlfriend!
 
 
On to my project. Alrighty then, what I have for you this time is a cute little shabby heart "LOVE" banner. As always I used loads of Shabby Is Chic Boutique laces trims and embellishments as well as bling. Some from all of my design team kits and some from my personal Shabby Is Chic Boutique stash. (The struggle is real ladies, I really do have 2 specifically designated areas in my craft room where I store my SCB items.) I did also use a few other items from my craft stash to make this project. 


I started by cutting 2 heart shape layers of muslin for each heart. I added a layer of quilt batting in between for extra fullness as well as stability. These layers were all adhered with a small amount of hot glue, leaving only the top portion of each heart open to facilitate hanging. Next I used layer of flat lace from my stash, I spritzed this with homemade pink with gold glimmer spray to add a pop of color behind Amy's adorable SCB crochet heart doilies. Next, I used Fabri-Tac to adhere a bit of vintage lace to the back of each heart doily. After deciding exactly where I wanted the doilies to rest on the muslin, I added layers of luscious dangle trims from Shabby Is Chic Boutique, I offset each layer to add to the illusion of "fullness". Next, I adhered the crochet doilies to now be-dangled muslin hearts. My project was really beginning to take shape.
 
At this point I have four muslin hearts with dangles, pretty pink background behind crochet doilies...I think to myself- "Nice, now for the fun part". I knew I needed bows. I wanted bling (umm, duh Goldie lol). I wanted butterflies. And I knew one way or another I had to incorporate the beautiful Wooden Landmark Buttons from SCB. These buttons have amazing graphics. So this is how this pretty shabby travel inspired "Love" banner came to a conclusion. Using hot glue I edged the crochet doilies with 4mm light pink flat back pearl trim. Then I tied a knot in each button center with pink and white striped bakers twine then glued it in the center of a cream colored chiffon shabby rosette from my stash. I also added a tiny rhinestone to each button for sparkle. Next I made a small pink seam binding double bow for each heart and attached at the bottom with hot glue. Next I added letters to spell out "LOVE". These are gold glitter foam stickers from my stash. I've had these for so long I have no idea where they came from. From here I moved on to the butterfly sections.
 
Each butterfly section is exactly the same. I used a piece of Shabby Is Chic Boutique dangle lace. I added a tiny pink rhinestone from my stash to the end of each point. I gave each SCB butterfly applique a spritz with that same homemade glimmer spray for a color pop then added a gorgeous SCB Pearl and Rhinestone bling piece. I also used a jump ring to dangle a Silver Heart Charm also from SCB. Lastly I added 2 tiny rhinestones to the tip of each antenna for even more sparkle!
 
 
From here I'm trying desperately to decide how this beauty is going to hang. In my search through what is now craft room chaos, I have discovered that I am seriously low on several key items to any craft stash due to over use - no jute, where did all that ribbon go? There's no way I'm using THAT color! I have other plans for that piece of lace! Man, I really did think I had more lace than this!? I don't want to go out right now, besides that the store is closed! Wow, how did I get here? Lol!! Okay, so after all of that, I decided to use a strand of soft cream colored pearls. I used Fabri-Tac and hot glue to encase the pearls between the back layer of muslin and the quilt batting to keep the "lump" towards the back side away from the decorations on the front. For the butterfly sections I glued the pearl strand between the butterfly and the dangle lace. It is barely noticeable on the back. I like that.
 

For a finishing touch, I added tiny acrylic flowers in pink, white and cream to the end of every dangle on each heart. I then used a dot of Glossy Accents to add a tiny rhinestone to every single acrylic flower. Lastly, I added a tiny cream colored acrylic flower and a pink rhinestone to each seam binding bow. I do love how this banner came out, it really does hang nicely but I can say if I had to do it over again I would change only one thing, and that would be hanging direction. I do believe for my available space this would be better if it hung vertically instead of horizontally. As it stands currently, horizontally it is and horizontally it will stay. Now to get my hubby to help me hang it...


Big crafty hugs and an even bigger THANK YOU AGAIN for having me as a design team member ~ Goldie
Don't forget to check out my video for a closer look at this project and as always please do remember to go over to Shabby Is Chic Boutique on Zibbet to grab everything you can for your upcoming shabby vintage craft projects for this year. 


Tuesday, 30 August 2016

Shabby Trinket Box by DT Member Maggie White

 
 Hello friends, Maggie here today with my shabby chic trinket box I created for Shabby is Chic Boutique on Facebook.


I papered the outside of a small round paper mache box with Graphic45 Gilded Lily paper.  I added the Chinese braid to the bottom of the box.  I then added the folded lace trim to the top.  I glued the Luxury lace pearl trim to the lip of the box.  On the inside I glued rose colored satin fabric.

Box Top:
I cut the side of the top off and added paper to the inside and more of the rose colored satin to the outside. I went around the edge with more of the braided trim.
 
Lastly, I glued the pearl cluster to the top of the lid and the rhinestone crown to the front of the box.
 
 Chunky Charm Dangle:

I made the beaded dangles with some pearls and glass beads and attached them to several small pieces of silver chain.  I attached those to the large ring at the top and added a lobster claw clasp to the ring.

Lastly, I added all the charms in between the beaded dangles throughout.
 

Here is my video on YouTube!
 
 
Thanks so much for stopping by today. Please check out Shabby is Chic Boutique on Facebook.


Tuesday, 23 August 2016

Shabby Christmas Decor with GDT Kim N.

Hi there, Kim here with my second Guest DT project for Shabby is Chic Boutique. This time I altered a glass block and turned it into a shabby Christmas décor piece.
 
 
I started with a glass block and glued wide lace around the outside, followed by 2 rows of mini flat back pearl trim. I adhered a piece of cardstock to the back of the block that has the message “Merry and Bright” on it and glued some lace from SCB under it.
 
 
On the front, I added some of the gorgeous blue lace from Shabby is Chic Boutique and some silver tinsel trim from my stash. In the center on the top I attached a stunning piece of rhinestone bling, also from the store. I love the look it gives the piece, almost like icicles. I also decorated the corners a bit by adding some silver stars and mini white foam roses that have been sprinkled with glass glitter.
Layering a handmade flower made from the white chiffon trim and light blue seam binding from SCB created the embellishment on the top. I also added some light blue ribbon, white tassels, and light blue pearls from my stash.


I hope you enjoy my project! I had so much fun thinking about winter and the holidays in this sweltering heat. Please check out Shabby is Chic Boutique and thank you so much for looking!


Thursday, 7 April 2016

Shabby Gift Set & Card with DT Member Kim C.

Welcome to this weeks project!
The last couple projects have been very extravagant, so this week I went simple.
I have made a little gift set with a matching card. I used lots of items from Shabby is Chic Boutique Store!


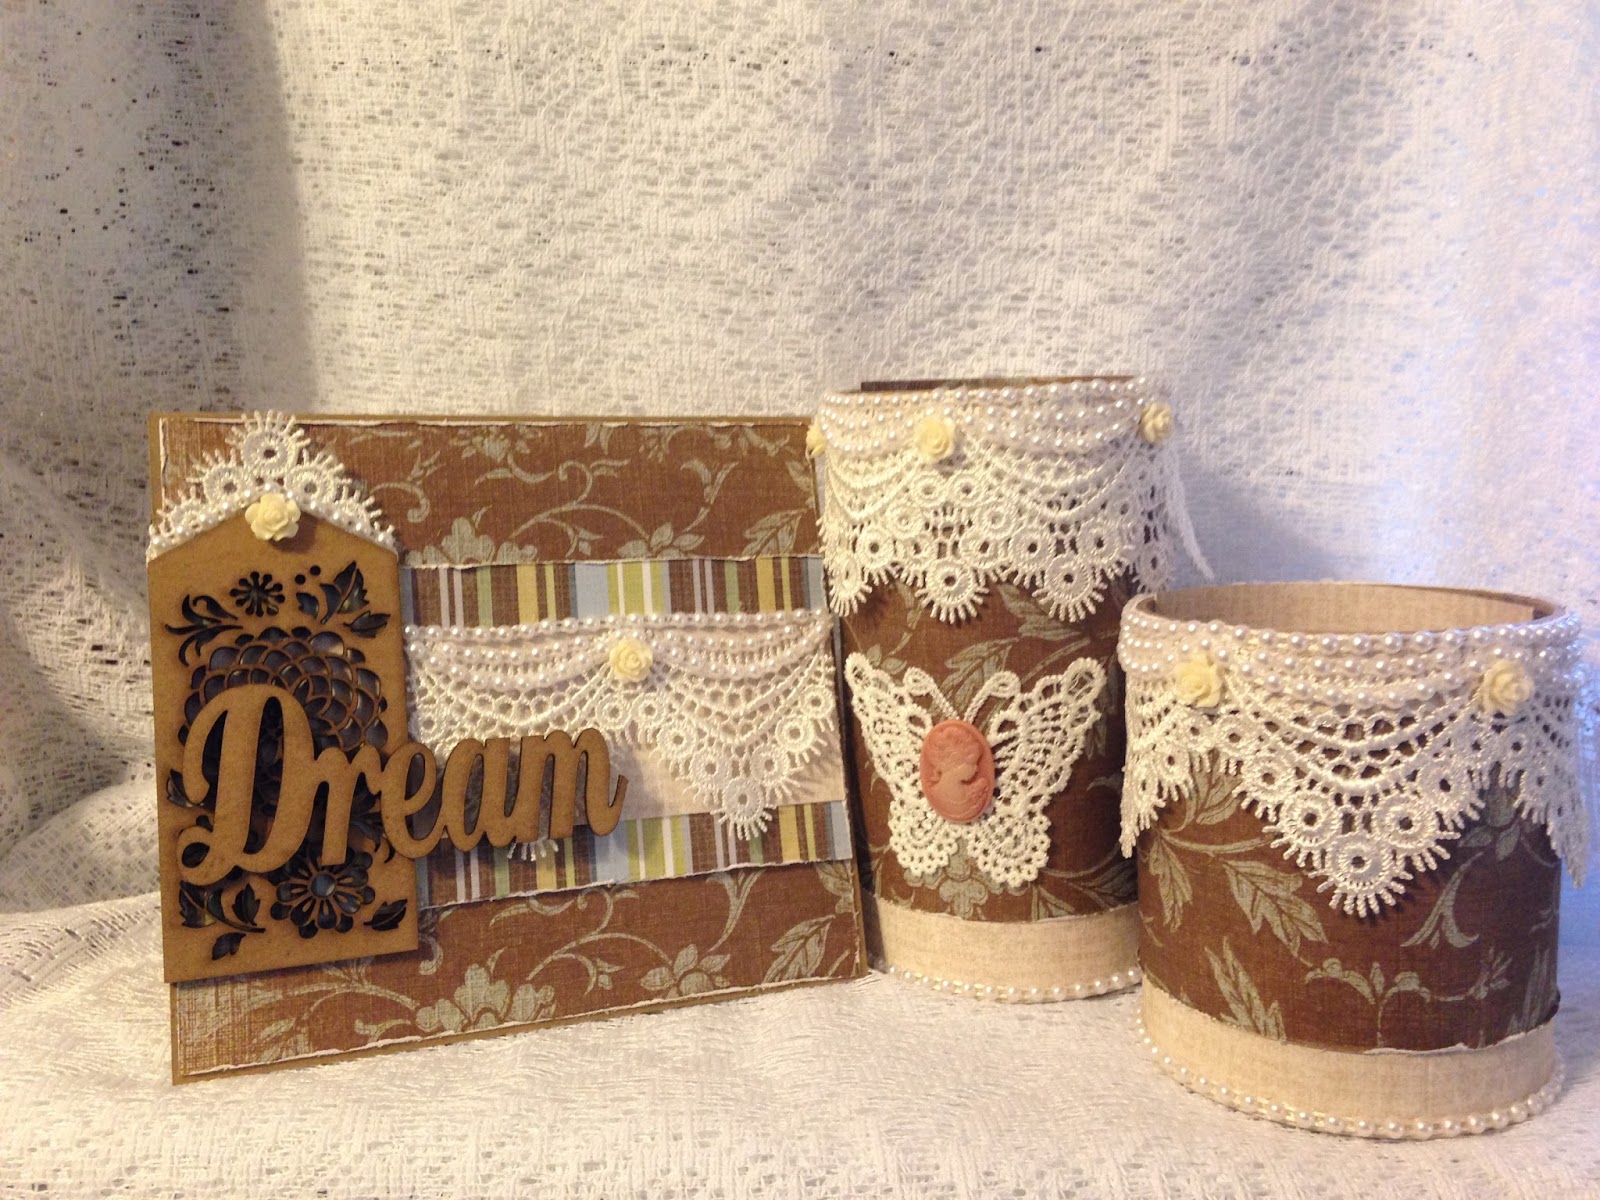
Starting with the card, it measures 6 x 5 1/4.  I added some pattern paper which I distressed all the edges.  I layered more pattern paper in two different styles, also distressing the edges.  I added a wood tag and a wood sentiment.  From Shabby is Chic boutique I added some beautiful lace, flat back pearl trim and some flat back roses to finish off the card.

 
My next item is actually some empty scotch tape rolls, which I glued together to form this pencil/pen holder.  I used more of the lace, flat back pearl trim, flat back roses and added a butterfly applique and a pink cameo from the shop.  I double layered the lace and added the pearl trim to the bottom.


This container is just a little smaller but just as cute!  I used a single layer of the lace adding the pearl trim and flat back roses as well.  If you look at the top of the lace you can see how I layered the pearl trim to give it a scalloped look.  I incorporated this technique in all three of the projects. 
 

I love the way my project has turned out.  Below is a list of the items from the shop that I used.
Thanks for stopping and Happy Crafting!!
Kim :)

10 mm off white flat back roses
18mm Vintage Resin Lady Cameo in pink
4mm White Flatback Pearl Trim
White lace trim
50mm White Butterfly 

Other items used:
K&Company Paper
Wood Tag
Wood Word

Monday, 28 March 2016

Victorian Photo Album by DT Member Kim F.

 
Good morning friends! Today I would like to share with you my Victorian Photo Album I have created with some amazing items from Shabby Is Chic Boutique Store.
 
 
I bought this photo album a few years back, it is a real Victorian photo album and is about 100 years old. The cover was in red velvet, however it was very, very worn and was in bad need of a facelift! 
 
I started off with some white satin from my stash and covered the entire album with that first, then it was time to get out my gorgeous laces and trims from SCB and get embellishing.  I started off with this first lace in the top left photo, it is the large Venise lace trim you see, and this covered the book beautifully. I used the rose and pearl trim for the spine of the book.
 
 
 I added a vintage lady in fabric from my stash to the center and then used the white leaf trim and the pearl trim on either side of her. On the top and bottom I used the mesh embroidered lace and the pearl and rhinestone trim to finish it off.
 
 
I embellished the corners with one of the .96" gold rhinestone and pearl flat backs on top of the bow applique.
 

I just love these 3 inch rolled satin roses Amy carries in her store, they were perfect for this project! I added a flatback pearl to the centers of each and even made my own flower as well. I added one of my favorite buttons from the SCB store, the vintage girl button.

 
For the sides I wanted to keep the antique closure that was on the album, so I used the scalloped pearl bridal trim so as not to cover it up, it worked out perfectly.

 
The finishing touches were the butterfly applique with more of the pearl and rhinestone trim attached to it. I added some vintage millenary flowers and foam roses from my stash as well.
 I love how this came out and now I am going to add lots of my family photos to this album I will be a family keepsake now!
 
Thanks for stopping by today and don't forget to check out all the gorgeous items in the
 
 
Butterfly Applique
16 mm Flatback Pearl
Cup Chain
White Flatback Pearl Trim
5.5cm White Lace Bridal Trim
30.5cm Venise Lace
Clear Rhinestone and Pearl Mesh Trim
White Leaf Venise Trim
Pearl Chiffon Flower Trim
Mesh Embroidered Lace
.96" Gold rhinestone & Pearl Flatback
3'' Rolled Roses in Cream and Dusty Rose

Thursday, 17 March 2016

Wedding Bridal Ensemble by DT Member Suzie Crafter

Good morning Shabby Is Chic Boutique fans!
 Suzie Crafter here today to share with you my project for this week. I have featured lots of
beautiful items from the Shabby Is Chic Boutique Store, so let's get started!
 
 
I created a Bridal Wedding Ensamble consisting of a Pillow Sachet/Ring Pillow with doilies and rhinestone pearl button and trims. A hand-bound Mini Book designed with scalloped laces, butterflies, pearl and rhinestone and lace trims.
 
 
For the Tussie Mussie, I made it out of hard cardstock, lined with vintage lace from my stash and added  beading tassels, pearls and rhinestone trims adorned with handmade flowers. And finally, a Bridal hanger designed with scalloped laces, flat back random pearls, a large metal button with a blue center completed this ensemble.
 
I hope you have enjoyed my projects today and will create your own bridal ensemble!
Thanks for stopping by today, please check out all the lovely items in the Shabby Is Chic Boutique Store on Facebook.
 
ITEMS USED
2 White Lace Butterfly Appliques
2 White Round Cotton Crochet Doilies
Metal Oval Flat Back Blue Rhinestone Button
Scallop White Trim
White Lace Pearl Trim
Rhinestone Pearl Flat Back Trim
flat Back Metal Pearl and Rhinestone Button
Cream Tassels
Flat Back Cream Round Pearls
Flat Back Round Pearl and Rhinestone Metal Button
Large Lace Applique
 
 
You may see my video "LIVE" on YouTube https://www.youtube.com/channel/UCIkC-XS6AfOmv8NncfwG4iw