Thursday, 17 November 2016

A Little Fairy Magic by DT Member Nichola

 
Hello everyone, Nichola here today with my next project for Shabby is Chic Boutique on Zibbet.
 
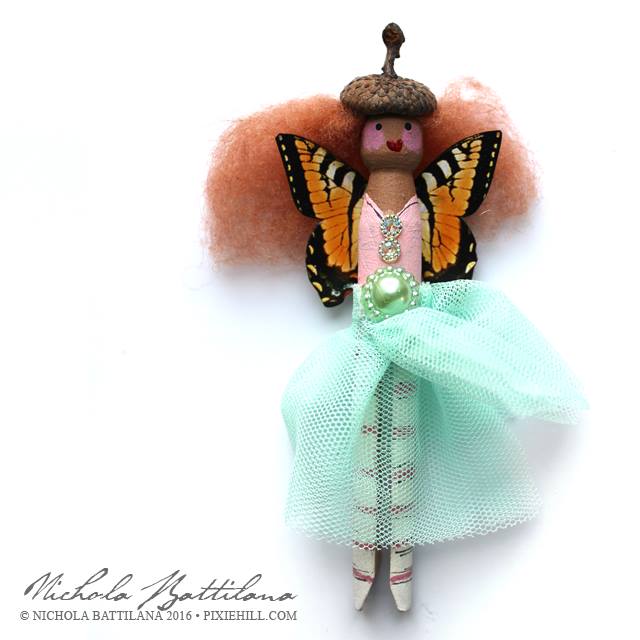
*gasps!* How cute is this years batch of peg fairies?! I made these ones with embellishments and trims from Shabby is Chic Boutique.


I'm so smitten with them. This Folded Tulle Trim is absolutely perfect for the little skirts. The little flatback pearly embellishments are also from Shabby is Chic Boutique. I didn't include them here, but these Silver Fairy Wand Charms would be a super cute addition!


I just love their floofy hair made from real wool roving. In all different colours.


They're such happy little things. With their acorn caps and their butterfly wings. I hope you'll make some too! And spread a little sweetness to those around you.

 
Thanks for stopping by today, and please check out Shabby is Chic Boutique on Zibbet, and for more info on this project and my other projects for SCB, please visit my blog Pixie Hill


Tuesday, 15 November 2016

Shabby Chic Altered Jars by DT Member Goldie

Good morning friends, Goldie here with my design team project for Shabby is Chic Boutique on Zibbet.
 
This time I have altered some vintage canning jars and a large bottle.


 My first project started out simple enough. I knew I wanted to use these two vintage canning jars. I didn’t have a plan or direction but I knew it was going to be pretty when finished because I was using Shabby Is Chic Boutique laces trims and embellishments. Using items from my design team kit as well as past Shabby Is Chic Boutique purchases this is what I came up with... 


I wrapped pretty Shabby Is Chic Boutique White Polka Dot Tulle trim which I secured to the jar with a tiny dab of hot glue only on the seam at the back. I then wrapped this lovely Shabby Is Chic Boutique Butterfly Dangle Lace at the top edge of the tulle trim and secured it the same with just a small dot of hot glue. I didn’t feel that it required loads of glue to keep it in place. To spice it up and add that iconic Shabby Is Chic Boutique flare I pulled out some Shabby Is Chic Boutique 3mm Rhinestone Chain. I thought about wrapping it around the jar as well but opted for a more out of the box approach so I cut each rhinestone apart and adhered each piece individually with a dot of hot glue. On the butterfly centers I hot glued cream colored flat back pearls from my stash. Not wanting to leave the neck of the jar naked and to keep the "canning jar feeling" I tucked the lid into the wire holder then used a cream colored pearl strand and a vintage paper flower from my stash also secured with a small dot of hot glue. For a centerpiece I used a gorgeous Shabby Is Chic Boutique Rhinestone Cameo secured with a spot of hot glue. Finally to keep my votive candle in place, I poured in some Himalayan Pink Salt. It allows the votive to sit firmly and not slide around. I love the look it adds to this project.

 
My process for this jar is exactly the same as the first jar except for the items used. On this one I used the beautiful and delicate Shabby Is Chic Boutique Soft Pink Stretch Lace first. Followed by a second Shabby Is Chic Boutique White Butterfly Dangle Lace. For sparkle I used more individual cuts of Shabby Is Chic Boutique 3mm Rhinestone Chain. For the butterfly centers on this jar I used Shabby Is Chic Boutique flat back Pearl Hearts. For the neck of the jar I loosely wrapped a generous length of Shabby Is Chic Boutique Pearl Garland in Ivory and secured it with a pink vintage paper flower from my stash using a dab of hot glue. The centerpiece on this jar is the same as the first as well as how I secured the votive. I will say it again, I love this project. 

Each of the recipients for these jars will adore the vintage chic feel to these home décor pieces but most of all they will love the items from Shabby Is Chic Boutique used to create these one of a kind gifts this holiday season.
 
Now, on to my favorite!
I started with this...
 
 
I knew I wanted to add lights to this bottle but I didn't want them to go in at the neck. So I used a glass drill bit and drilled a hole in the backside at the bottom edge of the bottle. (Take your time so as to NOT crack the glass.) 
 
 
I wanted sparkle as well, so I used one of Amy Love's favorite mediums (Glitter Mod Podge) from my stash. I sponged this on using a very light coat. Let dry overnight or you can speed up the process using a heat tool. (Be careful NOT to get overly close as it will bubble if over heated.) I love the sparkle and shimmer this adds to a project. 
 
 
Next step, I used small dots of hot glue to adhere a gorgeous Shabby Is Chic Boutique 9" WHITE Bridal Applique to the front of the bottle. Simple enough right? To further add to the beauty of this applique on each "stitched flower" on the pattern I used a dot of glue to add a Shabby Is Chic Boutique flat back Pearl Flower. The dimension it added is perfect. For a highlight at the top of the bottle I used a Shabby Is Chic Boutique Silver Metal Medallion that I bent to cup around the neck. I adhered it and a vintage bling piece from my stash with E6000. On the top of the cork I used a Shabby Is Chic Boutique Pearl Cluster bling piece which I glued on with a few dabs of hot glue. Around the neck I added a length of Shabby Is Chic Boutique Pearl Garland in Ivory folded into the center of a double bow made from white seam binding from my stash. For the centerpiece I used a second piece of the beautiful and versatile Shabby Is Chic Boutique Silver Metal Medallion pieces. This one I bent slightly to shape then cut in half and adhered each piece with E6000 just slightly apart to give the illusion of an oval. Making a nice background to attach the absolutely gorgeous Shabby Is Chic Boutique Bling Cameo Brooch. I removed the pin back and adhered with E6000
 
 
After allowing to dry overnight I finally got to add a small strand of lights from my stash. This altered bottle is beautiful and I think has to be a keeper. I love the sparkle but most of all, I love the display it makes for all of my pretties from Shabby Is Chic Boutique. 


Thank you so much for hanging out with me today I hope you enjoyed what you've seen. Also, please don't forget to check out my video below for more information on how I put these projects together.
 

Thanks for stopping by and please check out Shabby is Chic Boutique on Zibbet for all the items I used and more amazing goodies too!
Big crafty hugs ~ Goldie


Thursday, 10 November 2016

Shabby Box & Bag by GDT Sue Ann


Hello everyone, Sue Ann here today to share my first projects as Guest Designer for Shabby is Chic Boutique.


First up is this shabby little wooden box was created to demonstrate to you how we can alter laces to fit our needs. Using SCB's Heart Daisy Dangle Lace, I was able to create three different laces using just one of Amy's.
 
Our money will go further and also we can create something no one else has. This is not my idea and I learned this little trick from the very talented Maggie White and I must give her credit for this Fabulous trick.
 
 Now onto the how to...
First, give a base coat to the wooden box in your color of choice. Glue pretty paper to every area. Cut the bottom section of the lace off. I cut from the bottom of the daisies and go across my length of lace I need for my project. Glue the bottom section of lace to the bottom top edge of the box. Be sure not to glue the lid to the bottom or you won't be able to open your box. Yes I did that, lol... Now to separate the next section of the lace cut the daisy strip from the rest of your length of lace.   Put the daisy section away as we won't be using it for this project. Now glue the very top section of your lace to the very top edge of your box.
 
 
Next using SBC's 4mm white flat back pearl trim glue a length around the bottom top edge of the lid, just below the top section of the lace you previously applied to your box. Optional: you can add miscellaneous pearl pieces to each corner, and a handmade flower with bling to the center of the lid. Also add large pearls to the bottom for feet.
 
 
  Inside the box glue a piece of pretty paper to the insides as well. Please watch my video at the end of this post for more detailed instructions
 
My second project for this week is a Shabby/Vintage Gift Bag
 
 
First, remove the drawstring from the pouch. Paint the front and back of pouch with color of choice. Be sure to put a piece of acetate or cardboard inside your pouch to prevent it drying closed, then it will no longer be a pouch or gift bag.
 
Here is how I made the bag.
First, glue the scrap of lace panel completely around the pouch. Glue appliqués to front and back. Glue Heart Daisy Dangle Lace to the front and back bottom edge. Glue Pink She'll Scalloped Lace along top edge of the Heart Dangle Lace along the edge as well. Glue small flat narrow pink lace to top edge of the pouch.
 
 
Glue 4mm white pearl trim to the top edge of pouch. Also along the top edge of the pink shell scalloped lace edge. And glue pearl trim around the vintage photo. Glue the vintage photo to the front center of the pouch. Glue a white bow to each side of the pouch. Cut a length of the 6mm White Braid Trim for the strap and then glue a length of the pearl strand on top of the braid trim. Next, glue an end to each side of the pouch and add a large pearl bling to the center bottom of the pouch on top of the pink shell scalloped lace. Add a handmade stickpin to the side of the vintage photo for a final touch.
  Please see my video for more information on how I made both projects.
 
 
Thanks so much for stopping by today, please check out Shabby is Chic Boutique on Zibbet.
 
Big Hugs, Sue Ann


Tuesday, 8 November 2016

Shabby Box and Bag by GDT Donna

Hi there my name is Donna, and this is my first Design Team project for the Shabby is Chic Boutique. I’m so excited to show you what I have created. I created an altered cross paper box and an altered draw string canvas bag (which can be found in the shop).


In this picture you will see the cross box that I altered. I painted the box pink and then I used the white ruffled trim minus the lace. I cut the lace from the trim to shorten it. I used pink flat back pearls to trim the top of the lace. Then I cut the middle section of the floral lace and used it on top as well as the rose trim. On the bottom I used the multi strand pearls. I was really pleased how it turned out.


To make the altered bag, I used the soft pink stretchy lace to first cover the canvas bag. Then I used the white fabric lace on top of that. I cut and manipulated the pieces on the lace that I wanted to cover the bag. I tucked pieces of the white lace throughout the bag. I then used the pink scalloped lace on the top of the bag with two overlapping rows. I then used a section of the pale pink floral to line the sides.


To create the flower cluster, I used pink rolled roses, and ribbon to create a flower. I also used the lovely foam flowers. I snipped little pieces from the scallop lace to tuck in beneath the flower cluster as well as some of the rose trim.


The back was made much like the front with the exception of the flower. I used scrap lace from the ruffle trim and some of the pink trim to create a flower. I used the light pink daisy trim on the sides.
 
 
Here is a picture of both projects together. As mentioned all items used except the cross box were from the Shabby is Chic Boutique. I also made earrings, necklace, and a charm to put in the box and bag. The cross charms were from the shop as well.
 
 
Thanks so much for stopping by today, please check out all these items in the Shabby is Chic Boutique Store on Zibbet.


Tuesday, 1 November 2016

Parisian Altered Book by Kim

Good morning SCB fans! I am here to share my next DT project for Shabby is Chic Boutique on Zibbet.  This time I have created an altered composition book, in a Parisian Style. 
 
 
I started off by covering the book with this gorgeous blue and white ticking fabric from the SCB store. I used some quilt batting under the material to make it feel more dimensional, and also very soft to hold when I am writing in it.
 
 I covered both sides of the book in the material.
 
 
I also found this gorgeous image on Pinterest and printed it off on some fabric. I stuffed the image with more of the quilt batting, and it really gave it a very soft and feminine look. 


Once I finished stuffing the image, I began to work with some of the gorgeous laces and trims from the SCB store.  I also used one of the new, and so beautiful fabric roses in white, which you can see below. It has some amazing pearls and ribbon bow attached to it, just gorgeous!


 I framed the image with some of the white tulle trim first, then layered on some white embroidered floral trim, and some lovely soft grey trim from SCB. Once I was happy with the layering of the laces,  it was time to add the embellishments.


The first thing I reached for was this amazing vintage looking cameo pin. I am a collector of cameo's and this one from SCB is one of my most favorites. I will cherish it on the front of this book!


 I also added some of the scallop lace trim, in a soft grey to the side of the book, capping the top of the book off with a bow in some of the script ribbon in white.


I also used the same script ribbon for a tie closure on the inside of the book.

 
I used more of the scallop trim in white on the top of the book, and a tiny soft grey trim from my stash at the very edge of the book to finish that off.


For the bottom of the book, I used some of the white dangle trim from SCB, and more of the same soft grey lace I used around the image to tie it all together.


For the inside of the book, I carried the same fabric on inside, and added another free image from Pinterest in matching colours.  I edged the book in some light blue Chinese Braid, and edged the photo with some crochet trim from my stash.

 
Beneath the image, I created a pocket using some of the same white trim from the front of the book from the SCB shop. I also used more vintage laces from my stash in matching colours  as well.


I finished off the inside cover with a few small soft grey appliques and ribbon roses in white, from my stash.


For the back cover, I kept it simple with the layering of two laces from the SCB store to the top of the book.


For the base of the back of the book, I printed off my name and the date in fabric and added some left over SCB lace to surround it.


Once again, here is the finished composition book.
 
 
I hope you have found some inspiration here today, and will check out the SCB store for all these amazing items you have seen here today!
Thanks for stopping by, have a great day!