Friday, 28 October 2016

Vintage Lace Sewing Book by Kim

 
Good morning Shabby is Chic Boutique Fans!  Kim here today with a fun project that was years in the making!
 
 
Today I am sharing a lace book I have created. This book is filled with antique, vintage and some new trims, making it filled with memories and lush goodies!
 
Some of the laces I used are antique, I have had them in my stash for years, and have finally decided to unlock my hoard vault and create this very thick book.


The base of this book is made from felt. I used FabriTac Glue to make the base of the book and its binding.  All of the fabric images in the book are digital images I created as I wanted to really make this book feel old, worn and very, very shabby. I also stuffed all the images to make them more dimensional, using some quilt batting from my stash.

 
There are tons of hand sewn items on the cover, including the vintage buttons you see in these photos above and below.

 
I have also used the heart applique you see above from SCB, and I also added this gorgeous mini spoon, which I hand stitched to the cover, which is also from SCB.  I also hand stitched on some pearls to give a very feminine touch.

 
Along with the digital images, I also created some sentiments and printed them off on the same fabric. Below I have used the phrase "Sewing Supplies", and written it in French, to pick up on the theme of the book.  You can also see a safety pin attaches the sentiment, to which I added some pearls from my stash and also some fun charms from the SCB store.

 
As you can see the book is quite thick with lush laces, trims and vintage findings.


The flower on the bottom corner of the book finished off the cover nicely. I used bits and pieces of antique trimmings, some satin ribbon and a gorgeous pearl and bling piece from SCB for the center.


The first page of the book is created with a large vintage doily which I coffee dyed. I also coffee dyed some bridal appliques as well which surround the Prima Initial Card in the center. A beige seam binding bow finished it off. 

 
The next page I added some hand made stick pins and more appliques, doilies, and vintage laces. I created a small bow out of some left over muslin, vintage doily, flower applique and heart applique.
At the top of the page you can see another of my fabric sentiments, this one says "sewing".


The next page is all about this lovely lady and her parasol.  I kept the page in mostly deep browns, and added some white wedding appliques, trims and doilies for an accent color.  I also had stitched some vintage buttons and created a tassel out of some trim.
You can also see another of my fabric sentiments at the top of the page.
The doily, applique and dangle trim are from the SCB shop.
 
 
I also hand stitched on a lovely silver tea bag charm in the top right corner of the image from the SCB shop.
 
 
Flanking this lovely lady is another fun image I created. This time the page is all in tan's and dark navy blue. These are unusual colours for shabby chic, but I love them! This lady has a gorgeous fan she is holding and I framed her in some very old insertion lace I have had for ages in my stash.
 
 
The page itself is once again made from an old doily I attached to the felt base. I layered on lots of trims and pretty dangle laces at the bottom.  I created a focal point in the corner with a heart applique from SCB, a vintage doily and some vintage navy silk seam binding from my stash.  

 
You can see in the top left corner a cameo and bling bow brooch from my stash as well.


The second to last page is this lovely little Madame! I layered on lots of white laces for the background and then created a lace "frame" in an oval shape around her. Adding many, rows of vintage trim and gorgeous SCB laces. I also added more appliques to the top and bottom from SCB, and cut up some Venice Trim from my stash with a rose pattern, then hand stitched on some antique buttons with a rhinestone center. A hand made stick pin and hand made flower finished off this page nicely.

 
And finally, the last page. Here is where the sewing supplies reside in this fun little bag attached to the back page. This bag has two pockets, one to hold the sewing kit and the other to hold extra needles and measuring tape.


Finally, we are on the back cover. This image is from some fabric I had and I surrounded the image with more beautiful laces from SCB, Antique from my stash and Vintage findings.

 
I also created an little handmade by me tag for the base of the image.
 
Once again, here is the cover of my "little" book.
 
 
I hope you are inspired by my project today and will try making a vintage book for yourself.  They are so fun to make, and something you can keep and treasure for years to come.
Thanks for stopping by today, please check out Shabby is Chic Boutique on Zibbet.

Thursday, 27 October 2016

A Pretty Little Something by GDT Nichola

Nichola here today to share my next GDT project its a pretty something for Shabby is Chic Boutique today.
 

I've made a crown.
 Because.....
 A) I loves me a good crown
 And....
 B) how could I NOT make a crown with that Gold Embroidered Tulle Lace?
 
 
To create the crown, I began by making a base with a length of cotton fabric. I folded a long strip in half so that it was double thickness, then sewed it together to provide some stability, and prevent puckering. Then the ends were sewn together to make something that resembled an ugly headband.
Layers of lace were applied on top of that, then 'grungy' paint splashed on to sort of blend the different lace colours together.
 
I added Rows of Pearls Flatback Trim, 4mm flatback pearl trim-white and the Silver Wrap Filagree piece and star after staining the fabric.
 
To stiffen the peaks, I've applied gel medium. There are products available specifically for stiffening fabric, and they probably ARE more effective, but I wanted to use what was already on hand.


This will be a grand crown for lounging and lazing, especially on Mondays when crowns are needed most of all.
 
 
Other:
Tim Holtz Mirrored Stars
 
Thanks for stopping by today, and please visit the Shabby is Chic Boutique Store, so you can make your own crown too!


Tuesday, 25 October 2016

Shabby Gift Pouch by GDT Penny

Hello friends! Penny Arnold here with my very first guest designer post for Amy Love's site Shabby is Chic Boutique. 
 
 I was thrilled when she allowed me to design some projects this month with her wonderful products. I was even more excited when they finally arrived in the mail! That poor mailman, I was stalking him, and that package for a whole week! I was even more giddy when I started unpacking all those great notions, and laces. 
 
How did she get SO many items in that one little package? Truthfully, I don't know, but it was exciting pulling out each, and every one of them!


So this is one side of my finished cotton drawstring gift pouch. I love how it turned out.  Follow along with me, and I'll show you step by step how it was done!


So I started with this cotton drawstring pouch .  So cute even without adding anything to it, but even nicer after adding all of Amy's goodies to the outside of the bag. So I started decorating it at the bottom of the bag, and measured out just enough of this Butterfly dangle trim to go all the way around the bottom of the bag, on both sides.


Next, I folded the lace inside out, and sewed the two edges together that I had just cut. Then, I turned the lace to the right side again. It was now a circle that will fit the bottom of my bag.
 
 If you do this, and your bag is a little smaller, or larger than your lace circle, don't worry as it you can adjust it as you sew it to the bottom of the bag. I also lined up the dangle part of the lace pieces so they were back to back.


Next, I cut a piece of chipboard cardstock to fit the inside of my bag so I didn't sew both sides of the bag together while I was attaching the lace.  
 
While trying to keep your lace even, and centered I sewed the lace around both sides of the bottom of the bag with simple hand stitching, and a good white quilting thread.  Regular thread will work, but quilting thread is slightly stronger. I probably should have pinned it in place, but instead I just held it in place as I sewed.


I probably should have pinned it in place, but instead I just held it in place as I sewed.


Wow, it's looking pretty already! A little lace adds a touch of class to everything!
Thanks for stopping by today, please check out all the great items from Shabby is Chic Boutique on Zibbet.


Thursday, 20 October 2016

Shabby Chic Woodland Sleigh Kit in Pink by Amy Love

 
Good moring friends! Today I would like to share another take on the Shabby Chic Woodland kit. 
Amy has created the sleigh kit in pink and has a full tutorial on her YouTube channel below.
 
Isn't it gorgeous?
 
 
The kit comes chock full of items, laces, trims, that gorgeous bird, bottle brush trees, bling and more!
You have your choice of either a white kit or a pink kit.
 
Here is Amy's Tutorial!
 
 
There are still a few kits available, but you must be a member of the Shabby is Chic Boutique Facebook group to get one, so hurry over and join us!
Thanks for stopping by today.

Wednesday, 19 October 2016

Shabby Chic Woodland Sleigh Kit by Kim Fuller

Good morning friends!! I have a very special project to share with you today. This is the Shabby Chic Woodland Sleigh Kit, which is sold Exclusively in the Shabby is Chic Boutique Facebook Group.
You get so much in this kit I was able to make three separate projects! 
There is a lot of information to cover today so lets get started!
 
 
The sleigh you get in your kit comes Gold, but I wanted to paint mine white. I also added some silver sparkle to it as well, so I used some silver glitter spray over top of the white paint.
 
 
After the paint was dry, I added a piece of floral foam to the sleigh to achieve some height, and also I added some moss to the bottom of the sleigh so you wouldn't be able to see the foam from the outside of the sleigh.
 
 
I added more moss to the top of the sleigh, which really started to give it that "woodland" feel. Once that was finished I started to attach some of the gorgeous laces and trims from the kit.
 
 
I added a second layer of this beautiful pearl and lace trim on top of the scallop lace, its so gorgeous! Once that was completed, I started to add some greenery from my stash to the sleigh to really make it have the feel I was going for.
 
 
I also added some other greenery from my stash, but I didn't like the look of it, I really wanted it to feel wintery, so I sprayed the smaller greens white with some more of the silver sparkle spray too.
 
 
Once the sleigh was to this point, I began to work on the embellishments. First up is the bottle brush trees that you get with the kit. They were already so lovely I just added a tiny star from my stash to each of them and then glued them into the sleigh.


I used the pearls from the kit and added them to the front of the little trees. I added some Diamond Stickles to them to give them some Christmas sparkle!
 
 
You receive four of the very cool evergreen pipe cleaners in the kit as well. I made a little wreath for the sleigh using one of them, by just looping it into a circle, added some of the kit's eyelash trim and one of the 5 bows you receive in the kit. Its super cute and so easy to make!
 
 
I used some of the white seam binding from the kit and this gorgeous bling piece and created a lovely focal point on the front side of the sleigh.

 
For the runners on the sleigh, I added some of the lovely pearl trim and more of the eyelash trim and this really made it look so elegant!


You also receive a fun digital download with your kit and it includes this fun little banner! I printed mine off and used some vintage silk ribbon from my stash to attach the banner to it. I then added it to the side of the sleigh.


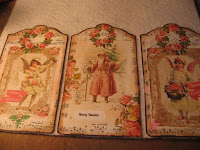
 I also used the three tags from the digital download and attached them together with some felt and pearl trim from the SCB store. I also added some pink cameos and rhinestone cup chain trim, also from the SCB store. I wanted to use the tags as a back drop for the little Christmas tree I created.


Back of the tags
 
 
Now on to the Christmas tree!  As I mentioned you receive 4 of the evergreen pipe cleaners in the kit. I decided I needed a little tree to stand beside the sleigh. I cut the pipe cleaners up and fashioned them to look like an evergreen tree.  I then used the little wooden spool, also from the kit, and made that into the stand for the tree. Lastly, I glued the spool to one of the doilies, and voila! A mini Christmas tree!
 
I cut out the rest of the images from the digital download for the kit and used them to decorate under the tree.


I used more of the eyelash trim as a garland for the tree, added some pearls and the floral flat back pearls and ribbon roses as decorations. I added a little rustic star from my stash to the top of the tree and another of the kit's bows and rhinestone bling to finish it off.

 
I also used three of the snowflakes that come in the kit and added a pearl to the centre.
 
Ok! Now we are going to work on this gorgeous bird that comes in the kit!
 
 
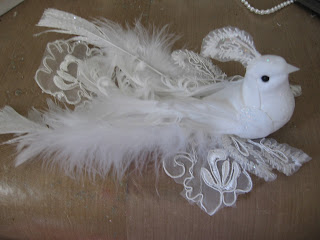
The kit comes with some beautiful feathers and also a lovely large white applique. I wanted to dress up my bird with the extra feathers and I cut up the applique and added it to the bird as well.
 
 
I used one of the applique pieces and added it to the head of the bird, to give him a fancy plume. I also added one of the stars from my stash, that I used on the bottle brush trees so they all matched.

 
For a finishing sparkle, I added some of the Diamond Stickles to the wings and body of the bird. Below is the finished bird, I love how this little beauty turned out!
 
 
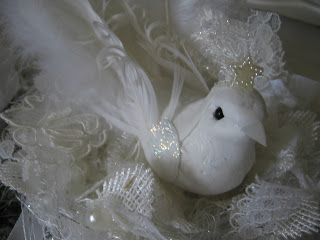
As you can see, the bird needs a little nest to sit in. I used up all the rest of the laces and trims and one of the doilies from the kit and created a lovely shabby nest for my bird to rest in.
 
 
I cut up the remaining pieces of lace and began to glue them around the doily, putting pieces here and there to begin to build up the nest.

 
I used the remaining seam binding and tied little knots in them and added them to the edges of the "nest", along with the rest of the eyelash trim as well.  I finished off the nest with some white felt I added to the bottom of the doily, from my stash, which gave the nest a bit more stability.


Last, but not least, its time to alter the mini grapevine wreath you get with the kit.  I wanted to add this wreath to the back of the sleigh and have it as a focal point. I began by wrapping the eyelash trim around the wreath, and then used the remaining pearl trim for the next layer.


I used the last piece from the digital download, which is a lovely Victorian Christmas sentiment. It was heart shaped, so I fussy cut it out and glued it to a wooden heart from my stash. If you don't have a wooden heart, you can do the same thing by cutting out some thick chipboard or heavy cardstock.

 
Once the glue was dry, I added some pearl trim around the edges and then glued it down to the last doily.


 I added the remaining bows, ribbon roses and bling to the wreath and then glued it down to the doily. It is now ready to add to the back of the sleigh.
 
 
When I added it to the sleigh, I felt it needed a little something, so I used another bling piece from the SCB store and a bit of seam binding to make a bow and then I felt the sleigh was now complete!
 
 
Here is the completed sleigh!  I am totally in love with this kit, you get so much and as you can see I was able to make three full projects out of just one kit!


I hope you will check out the Shabby is Chic Boutique Facebook group and you can get one of these kits for yourself.
 
If you would like to see more products from SCB you can check out the store on Zibbet.
Thanks for stopping by today!