Tuesday, 24 January 2017

Planner Band by Amylove

Hi everyone! I knew as soon as I ordered my Prima Planner that I wanted to make a beautiful band for it. I finally got around to making one and I LOVE it!!!


These are the items I used from Shabby is Chic Boutique

White Doily- out of stock
Rhinestone cup chain-out of stock
Bling crown-out of stock

Please follow this link for a tutorial on how to make one for yourself!


Sunday, 15 January 2017

Shabby Wall Hanging by DT Member Goldie

Hi everyone Goldie here today and I am sharing my wall hanging I have created for Shabby is Chic Boutique on Zibbet. I love how sweet this turned out.
 
 
 I used lots of Shabby Is Chic Boutique laces and trims from my design team package as well as a few from my own personal Shabby Is Chic Boutique stash. I also used a piece of fabric from my own stash as well. 
 
 
I started with a large piece of heavy duty chipboard which I cut down to 8" x 10". I covered both sides of the chipboard with some lightweight quilt batting, then covered both sides with some off white muslin. This makes a sturdy base to work with for adding laces and trims. I covered just the front side with that delicate pretty pink fabric from my stash. Everything in this project was adhered with Fabri-Tac or hot glue.
 

As you can see from the photos I have lots of layers going on from the top to the bottom and along the edges as well. Those cute little pink clay flowers I could swear I ordered from Shabby Is Chic Boutique back when it was just a Facebook page. (?Am I right or wrong Amy?)


I don't remember where I found this image so whoever you are that made this, thank you! It's brilliant and please know that it is being used only for this wall hanging which will be hanging in my craftroom.


The image has two layers of quilt batting behind it for maximum "puffy" effect, and was framed with a narrow trim from my stash. To finish the image area, I added a piece of Shabby Is Chic Boutique 3 mm Rhinestone Chain to the dot of the 'I' in the word witch. I used one of the gorgeous Pearl and Rhinestone Crowns from my Shabby Is Chic Boutique stash and added a tiny seam binding bow from which I hung a Witch Hat Charm from SCB. I also added two of the "drops" from the Pink Teardrop Sprays for added dangle cuteness, these little goodies are absolutely multifunctional. I also used individual pieces of SBC's amazing 3 mm Rhinestone Chain to add serious sparkle at the bottom. I put one piece on each of the White Tassel Trim dangles. 
 

For the bow, I used all things SBC, such as seam binding, tiny pearl strands and other various narrow trims. I tied this shabby bow by hand. I'm not thrilled with it, but that's okay, it's supposed to be shabby right? I used a Silver Wrap Filigree from SBC which I painted off white then added a Rhinestone Heart from my SBC stash to finish it off.  Also to finish the entire piece I added my label to the back. (The odd color on my label is just from the wet glue. It's clear and looks normal when dry.)
 
Thanks so much for stopping by today, please check out my video below.


Beautiful I think.
xoxo ~ Goldie

Monday, 9 January 2017

No Sew Pretty Girl Pillow by Kim

Good morning Shabby is Chic Boutique Fans! I have a fun and easy project here today for you today.
 
 
I have created this no sew pillow with some fabric from my stash and lots of laces and trims from Shabby is Chic Boutique. But the gorgeous girl in the center is really the star of the show. I used this Pretty Girl Applique from SCB.
 
 
I surrounded the girl with this pretty rose trim from SCB, which goes all the way around her to frame her nicely.


I created a rolled rose out of some sheer fabric I had in my stash, and added a pearl and rhinestone bling to the center. I added this to her hair for some fun and dimension.

 
I used Fabri-Tac Glue to make my pillow square and then added lace fabric from my stash to cover the pillow.


I just love this Pretty Girl Applique from SCB!! I have to get more, as I have a few friends who would like this pillow as well, but I think she would also be great on a T-shirt, apron, wall hanging, or even a tote bag. She would be versatile for so many  projects.

 
I hope you have found some inspiration here today, and will pop over to the Shabby is Chic Boutique Store on Zibbet to get your own Pretty Girl Applique!


Saturday, 31 December 2016

Shabby Altered Emboridery Hoop by Kim

 
Hello friends, Kim here today to share my next project for Shabby is Chic Boutique on Zibbet.


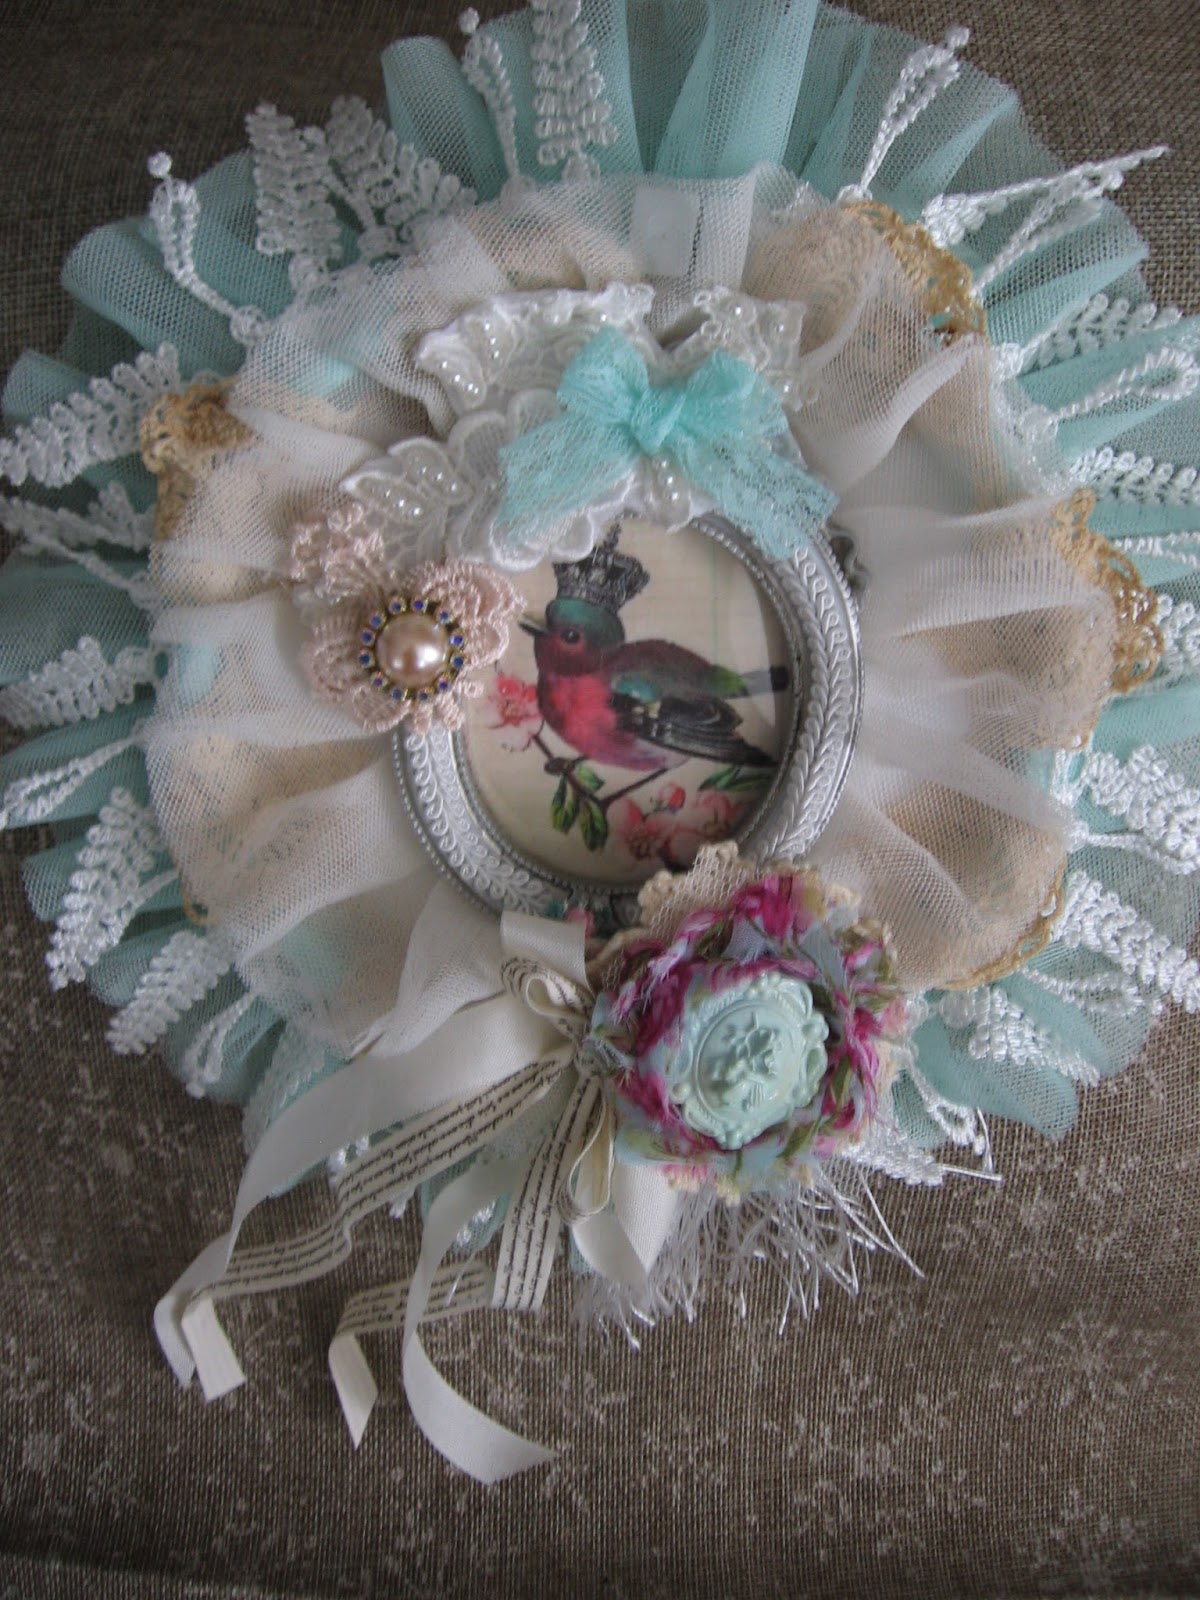
This time I have created a shabby altered embroidery hoop. I used lots of laces and trims from the SCB Store. I surrounded the hoop with some of the gorgeous aqua tulle trim. I just loves this stuff, it is probably my favorite trim in the SCB store.

 
I printed off the image of the bird from Pinterest, and put it inside a frame from Michaels.

 
I used more of the tulle trim, this time in ivory, around the frame to make the image very soft and romantic looking.

 
I have done a full video tutorial which you can find below here.
Thanks for stopping by today and please check out all the great items in the SCB store.


Wednesday, 14 December 2016

Parisian Inspired Pillows by DT Member Goldie


Hi everyone Goldie here. While patiently waiting (yeah right!) for my December design team package I wasn't sure what to expect. This month I asked Amy to surprise me, you know like those cooking shows, open the box and surprise, see what you can do with what you have. Well let's just say I was pleasantly surprised and why wouldn't I be. I mean seriously, Shabby Is Chic Boutique and Amy Love have some of the most beautiful trims, laces and other goodies available on the market today! 


During the wait for my package to arrive I did what we all love to do, I perused Pinterest for inspiration. (I do this at least 3 times a week.) When I saw what Amy chose for me I was so excited because I knew exactly what I was doing with it. 


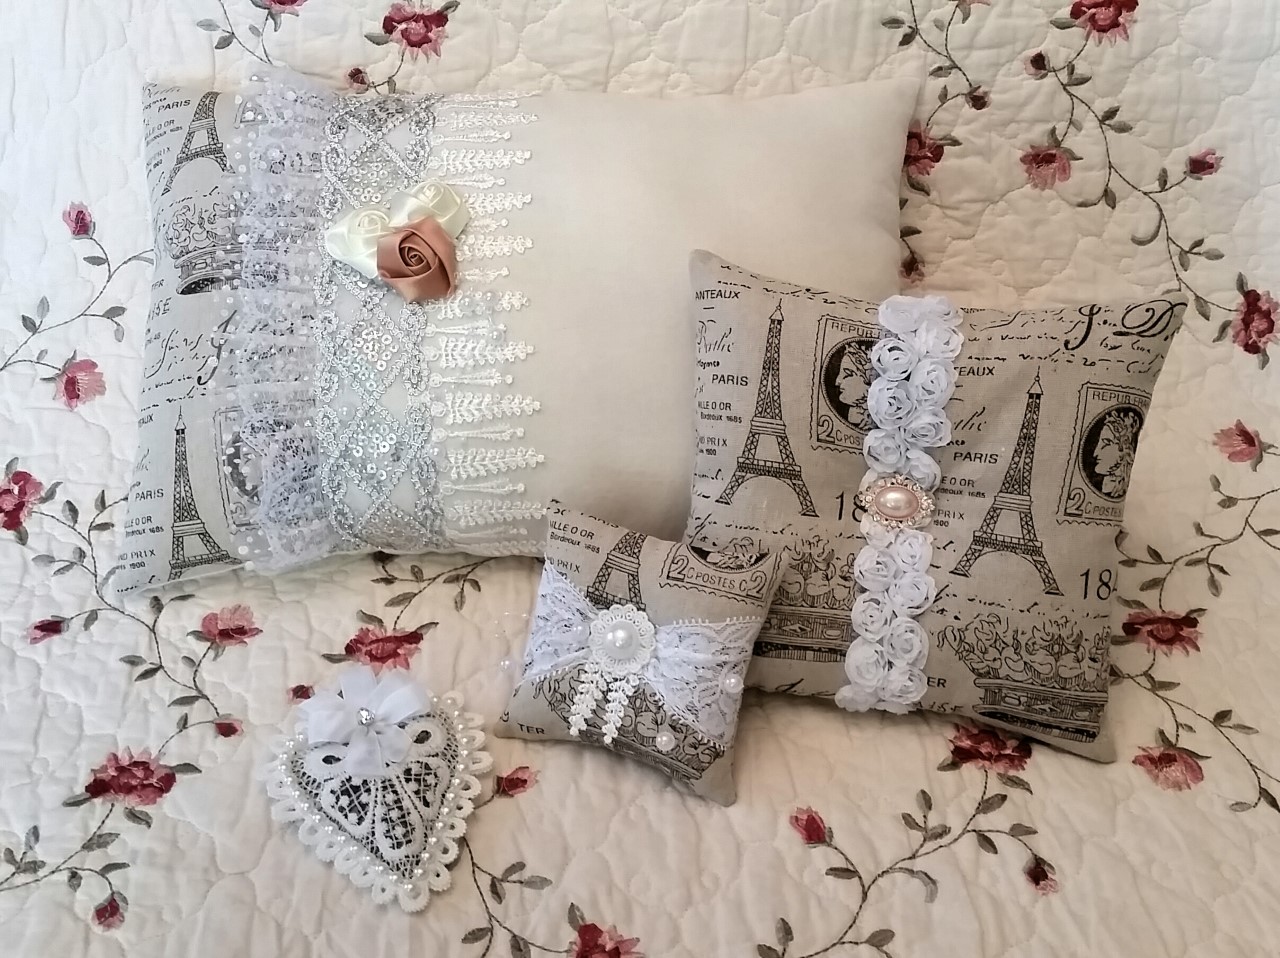
Shabby vintage-ish style pillows. I used some fabric from my stash as well as my sewing machine and a few odds and ends to create this adorable set of pillows.


For the largest pillow I used Shabby Is Chic Boutique Glittered Polka Dot Tulle Lace, Embroidered Sequined Trim, White Tassel Trim, 2 Cream colored Rolled Roses and 1 Copper colored Rolled Rose. (These are beautifully made.) I also used a bit of the White Pearl Garland. All of these items were either sewn on or glued on using Fabri-Tac glue. I love how this pillow turned out!
 
 
 The medium sized pillow was very simply done with Shabby Is Chic Boutique White Rosette Trim down the center front, glued with Fabri-Tac glue. Down the center on the reverse side I used the 6mm White Braid Trim. I then used a needle and thread to draw the center of the pillow inwards. (I love this look.) To cover the stitches in the back center I used a Shabby Is Chic Boutique Rhinestone Cameo from my own Shabby Is Chic Boutique stash (it does exist) and a Mini Doily Applique from my package to make a beautiful center that was attached with hot glue. To finish off the front I used a bit of hot glue to adhere the very sparkly Gold Bling with Pearl. I can't decide which side I like better as they both turned out fantastic. 


On the small pillow I used Shabby Is Chic Boutique White Stretch Lace sewed at the outside edges as I attached the front and back sides of the pillow together. To finish this cute little pillow I used needle and thread to draw the front and back centers together, I also gathered the White Stretch Lace at the center and stitched it in place. To cover the stitching on the back I hot glued a small flat back pearl from my stash. For the front I used hot glue to add 2 dangle bits from the White Tassel Trim, then added some White Pearl Garland. For a centerpiece I used a Mini Doily Applique and a larger flat back pearl from my stash. I think this one turned out adorable. I discovered I've been actually using it as a pincushion. Thinking it needs to move to the bedroom with the others. 
 
 
Lastly, I made a sachet for a closet or drawer. I used 2 of Shabby Is Chic Boutique Heart Appliques. I applied a little amount of hot glue and adhered some white tulle from my stash to the backside of each applique. Then glued them together back to back leaving an opening at the top. I filled this little lovely with a delightful smelling tea called Winter Mist. Yes, I said tea! (It's my favorite and makes the whole house smell like Christmas all the time.) I closed the top with glue. I used small dabs of hot glue to adhere Shabby Is Chic Boutique 6mm Ivory flat back Pearl Trim around the edges on the front and back I used a bit of white seam binding from my stash to make a hanger as well as a double bow for each side. To add some sparkle, I added a Shabby Is Chic Boutique Mini Teardrop Bling to the center of each bow. This tiny delight turned out so sweet. I'm thinking I have to make more of these!!
 
Thank you Amy for choosing the items that you did, I think everything worked out perfectly. Also thank you to everyone for your time and attention today, don't forget to go see all the wonderful things Amy has to offer at Shabby Is Chic Boutique so you can create your own set of shabby chic pillows.


Saturday, 10 December 2016

2017 SCB DT Call!!

We are having a DT CALL!!!!

What we are looking for:
Card makers
Mixed media artists
Fabric artists
Scrapbookers
Crafters
We are looking for a variety of styles for our team.

REQUIREMENTS
You will be required to create two projects a month using SCB products.
You must have an active blog or YouTube Channel to which you post regularly with a minimum of 2 post per month featuring SCB products with links back to our blog or YouTube video. These posts will also be published on the SCB blog with your links added. You must be able to write professional, concise and personable posts as well as provide clear photographs of all of your work.
You must have a Facebook page. We do the majority of our communication in our private group.
You are required to promote Shabby is Chic Boutique on forums, our blog, and social media outlets like Facebook, Pinterest, Twitter, Instagram, Flickr and other sites.
You should be organized, able to meet deadlines and be a TEAM Player!!
From time to time, there may be optional additional project opportunities, but advanced notice will always be given. For example, blog hops.
BENEFITS
The opportunity to be apart of a fun, supportive group.
An opportunity to have your work featured through our blog, store, and other social media sites.
A discount to SCB store.
Free Design Team Packages
This is for a three month term that begins on Febuary 1st. The new design team will be announced publicly on Jan. 23rd.

HOW TO APPLY:

Make a project specifically for this DT Call showcasing laces, trims, and embellishments so we can get an idea of your design style.  The items you use for your entry do not have to be purchased from SCB. Make a blog post or YouTube video sharing your project with the heading “Entry for Shabby is Chic Boutique DT Call”,  Send the link to your project along with the following information when applying.

Please provide your name, mailing address, email address. Include links to your social media: Facebook, Instagram, etc. List any current and past design team experience and any galleries where you feature your work. Send all of this information to shabbyischicboutique@gmail.com with DT call and your name in the title.
This DT call ends January 16th . It is open to US and Canada applicants.


Please do not apply at this time if you are currently designing for a company that sells similar products as SCB.

Father Christmas and his Reindeer by Kim Fuller

Good morning friends! Kim here today with my next DT Project for Shabby is Chic Boutique on Zibbet.
 
This time I have altered some Christmas ornaments that I got at my local dollar store. First up is my shabby and wintery Father Christmas.
 
 
We have all seen some funky looking Christmas decorations at our local dollar stores, and this fella was no exception to the rule. He was originally very, and I mean very tanned looking. This Santa is just a plastic head that came with some tinsel for a beard and a very funny looking hat. Really, he needed lots of work, and I wanted a challenge, so here we go!
 
 I totally repainted his face and eyes, to give him a softer and more rosy cheeked look. I used some chalk paints from my stash to repaint him, and then gave him a coat of Mod Podge to ensure that the pain would not come off the plastic.
 
 
I used a vintage table cloth, which I cut up for his hood and draped it over his head. I added a bit of stuffing to the top of his head so it would sit up nicely on him. I also used lots of laces from the SCB store on him and cut them up and made him look shabby and wintery.


I used various SCB laces, seam binding, wool, unbraided rope trim and a bit of the original tinsel beard and totally revamped his beard for him, I think it really makes him look handsome now!


While I was at the dollar store, I also picked up some glittery white branches and berries.  I cut them up and added them to the side of his face for some dimension and also added some seam binding and some ribbon from my stash too. I used some of the tinsel that was from his beard to make a bow with as well.


He is really kind of adorable, and will have a nice place to hang in my home this Yuletide season.
 
 
Now on to the reindeer! 
When I spotted these at the dollar store, they were silver plastic with a giant glitterly red Pointsettia on them, oh ya, and some red polka dot ribbon!  Not my style at all!
 
 
I gave each of the reindeer an over haul with some white chalk paint to start off with. Then, I choose to make two of them pink and one of them in a shabby Aqua colour. These little beauties are going as gifts to some crafty friends of mine, and I needed to make them in their favorite colours.


Once I had the white paint on them, I used some of the Prima Art Alchemy paints on them and also some Prima Bloom Sprays in coordinating colours.
 
 
I then added some laces from SCB and also some trims, pearls and flowers to their backs to give them a festive look.

 
I am pretty pleased with how they came out, from their silver coats to this Shabby look, I think its quite a transformation.


Next time you are at your local dollar store, take a second look at some of the items they have, they are inexpensive and can be transformed into something that looks rather expensive. Challenge yourself to try something like this, I had lots of fun, and as we all know the holiday season can get very expensive and this is a good way to cut costs down and give a gift that can be appreciated every year!
 
 
Thanks for stopping by, and please check out all the great items from the SCB Store!